

DSDLink Tutorials
Select Business & Distibutor
How to select your Business/Distributor
NOTE: You can now view and select your Business and Distributor from any page on DSDLink

Note: When you have selected multiple distributors, the text will display ‘All Distributors’
From within DSDLink, use the pull down menus to select a Business and Distributors
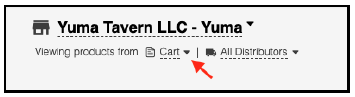
At the top left of the page, select the business name. If you have multiple businesses, a dropdown menu will appear for you to select the desired business
Below your business name, select your distributor’s name to view a selectable dropdown menu to choose which distributor you would like to order from
Shop Page Overview
1. From within DSDLink, navigate to the Shop page

2. By default the ‘All Products’ tab is selected from the top navigation bar

All Products - All products authorized to be purchased by the business
Recently Purchased - Products that you have recently purchased
On Sale - Products that currently have a promotion tied to them
New - Products that have been added within the past 60 days
Recommended - Products that are recommended by the distributor
Seasonal - Limited time products based on the distributor
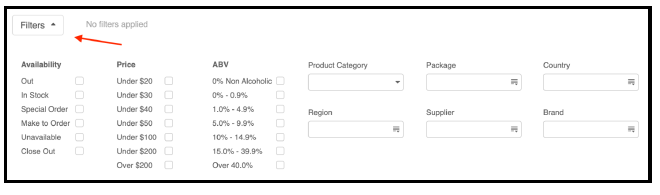
3. Apply filters to view more specific items on the Shop page. Click the Filters button and apply filters by Availability, Price, ABV, and other fields then click the ‘Apply’ button
4. To change the layout of the page select either the list or tile options located on the right side of the page

5. To find out more details on a product, select the product tile or name. Here you can see additional product information such as Style, Brand, Supplier, and more
6. To search for Products there are two options. Click the three dots to the left of the search box to select which type of search you want to use
Standard search - Allows you to search by Product Name, Brand Name, Supplier Name, and Product ID
10 key optimized search - Allows you to search by Product ID only. Type in a Product ID, hit the Enter key, type in a purchase quantity, then hit enter again. Continue doing this till you have entered in all products you wish to purchase

Best Practices: DSDLink will always default to Standard search and you must manually change to 10 key optimized search when desired
Placing an Order Guide
1. From within DSDLink, navigate to the 'Shop' page

2. Apply filters to view items on the Shop page. Click the Filters button and apply filters by Availability, Price, ABV, and other fields then click the ‘Apply’ button
3. To search for a specific product, go to the search bar (located on the top ribbon) and search by keyword such as Product name or Product ID
4. Click to select a product you wish to order and enter the Quantity in the field provided
5. Click the ‘Add to Order’ button in the bottom right to add the item to your Cart
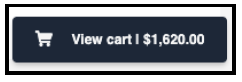
6. When all products have been added to the cart, place your order by navigating to the Cart by clicking the ‘View Cart’ button

7. From the Cart view, select ‘Review Order’ to make changes
8. Click the ‘Place Orders’ button to complete and place the order
Import Files Guide
The file you import must have a Product ID and the Number of Units in the following format:
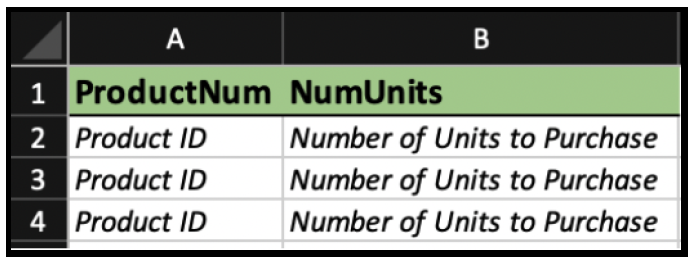
You must name your columns ‘ProductNum’ and ‘NumUnits’
1. From within DSDLink, navigate to the ‘Cart’ page

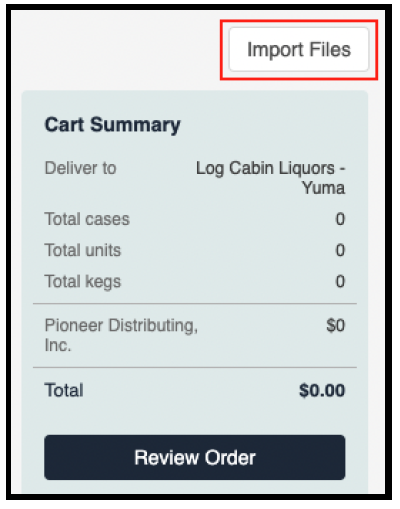
2. Click the ‘Import Files’ button at the top right of the screen
3. Choose the distributor you would like to import an order for and select the ‘Choose Files’ button to select your file
Note: You can only upload a file for one distributor at a time and your file must be either a .csv or .xls. file
Best Practices
● These column names are case sensitive and cannot have any spaces in them
● NumUnits should be the total number of units to purchase
Example: If a product has 1 Case = 6 Bottles, NumUnits should be 6 when ordering 1 Case
Cart Page Overview
1. From within DSDLink, use the menu to navigate to the Cart page
2. The Cart page shows the default cart, and users can change to a Saved Cart by selecting the Cart option at the top of the page.
Note: Saving a Cart does not place the order with a distributor
3. In the main body of the Cart page, expand sections to view potential Orders and products on an existing cart or Shop for Products. Sections are broken out by date or delivery stop
Note: Products are added from the Shop page and go to the default cart automatically. If Saved Carts exist, they will be displayed to select from on the Product Detail overlay on the Shop page.
4. Click a PO Number to edit or change the value
5. Click the ‘Add memo’ link to enter additional notes or text

6. Click the three dots in the right upper order of the order page to access more options
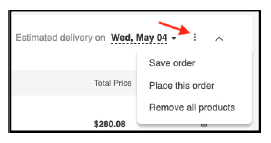
Save order - save an individual order for the distributor selected
Place this order - place this order for the distributor selected
Remove all products - remove all products on this order for the distributor selected
7. Expand and collapse the items ordered for that specific delivery stop using the action arrow
8. Once you are ready to place the order, select the ‘Review Order’ button on the right side of the screen and click ‘Place Orders’
Past Orders Page Overview
Hello, World!
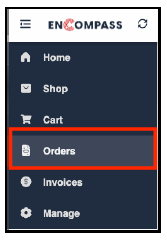
1. From within DSDLink, navigate to the Orders page on the left side menu
2. The Business and Distributor is identified at the top of the page, click the drop down menu to select a different Business or Distributor
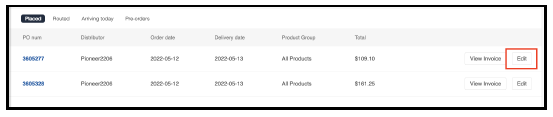
3. Click to select a quick filter to display Orders by status
Note: ‘Placed’ are selected to display by default

a. Placed - orders that have been placed but not yet routed
b. Routed - orders that have been locked for routing by the distributor
c. Arriving Today - orders that are scheduled to arrive by the end of day
d. Pre-orders - orders that have been created for ‘pre-order’ status products
4. To edit an order in the ‘Placed’ status, click the ‘Edit’ button for the order you’d like to modify
Note: Orders in Routed, Arriving Today, and Pre-Order Status are not able to be editing
5. To track a ‘Routed’ order and select the ‘Track’ button
6. To view the products on an order, select the ‘PO Number’ link
7. To see the invoice select the ‘View Invoice’ button

Best Practices: The orders page only shows your current orders, all historical information is found on the Invoice Dashboard
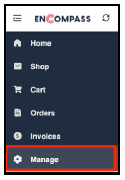
Manage Page Overview
How to add Distributors
1. From within DSDLink, navigate to the 'Manage' page

2. To add a new Distributor under the ‘Distributors’ tab, click the ‘Add New Distributor’ button

3. Enter the distributor information. You will need the following information in order to add a distributor:
Customer ID
A past Invoice Number
Distributor Name
4. Click ‘Connect to Distributor’
How to Manage Users
1. From within DSDLink, navigate to the ‘Manage’ page
2. Select the ‘Users’ column in the Manage page
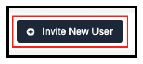
3. Invite new users to the business by clicking the ‘Invite New User’ button. You will need to enter the following information:
Full name
Email
The role you wish to assign them
4. Change the role of existing users by clicking on their current role. There are four (4) roles you can assign a user:
Retailer View Products, Enter Orders - User is able to view products and enter orders, but not submit them
Retailer Role 1 + Submit Orders - Same as Role 1, but now they can submit orders
Retailer Role 2 + User Management - Same as Role 2, but they can manage users as well
Inactive - Do not have any permissions, but are still connected to the account. (This is meant for users who will eventually be given permissions, but still want to remain connected to the business.)
5. The last function of this page is to Disconnect users. This is done by selecting the three dots on the far right of the user
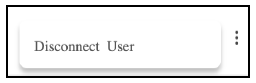
Note: Disconnecting the user will remove them from the business, but their user will still be able to connect to other businesses in the future
How to Connect a New Business
1. From within DSDLink, navigate to the ‘Manage’ page
2. Under the ‘Business’ tab, click the ‘Connect a New Business’ button.
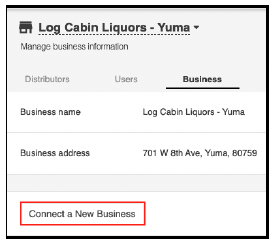
3. Follow the steps of linking a distributor, entering the customer ID, and any verified invoice number, then select ‘Connect to Business’
Best Practices: When connecting to a distributor, make sure you use your Customer ID with that specific distributor.
Still need help? Reach out to us here.